2014/05/17

4種PDF轉Word的免費方法(pdf to word, pdf to doc, pdf2word, pdf2doc)

本文將介紹4種將PDF轉Word檔的方法,分別分析其效能、方便性、精確性等指標。

1. nitropdf提供的線上 Convert PDF to Word (DOC)

這是一個線上免費PDF轉Word檔的服務,網址:http://www.pdftoword.com/
選擇你要轉的PDF檔案:
pdftoword
選擇要輸出的格式:
pdftoword (1)
填入你的email,將「Receive PDF to word news」取消,並且按Convert,過一段時間後,去信箱檢查轉好的word(doc)檔案。
 pdftoword (2)
優點:免安裝軟體(網頁版)、免費
缺點:時間較慢、一次只能轉一個檔


2. pdfonline提供的線上PDF2Word Online: Convert PDF to Word for Free


這也是一個PDF轉WORD的免費線上工具。但是不用提供你的Email給對方,可以直接下載轉好的WORD檔。網址為:
按「瀏覽」選擇要轉的PDF檔案,接著按下「Upload and Convert」啟動PDF轉WORD轉換程序:
PDF to Word
PDF轉WORD的期間會出現這個畫面,不要關掉此視窗:
PDF to Word (1)
最後會出現PDF轉WORD成功的畫面,點選「Right-click here」即可下載:
優點:PDF轉WORD時間快、不用提供Email、免安裝軟體(網頁版)、免費
缺點:一次只能轉一個檔


3. Wondershare PDF to Word Converter(推薦)


AnyBizSoft PDF to Word 是一個易於上手的工具程式,專門將 PDF 格式的檔案轉換為 Microsoft Word 文件檔案 (.doc 和 .docx) 。只需按一個按鍵,便能輕易的把唯讀的 PDF 檔案轉換成可修改的 Word 文件檔案。 轉換成的 Word 文件檔案,可完全保留原始檔案的頁面佈局、文字內容及圖片。 PDF to Word 可同時間轉換最多 10 個 PDF 檔案,另外,你亦可在轉換時選取 PDF 檔內的某一頁碼。
更多介紹:Wondershare PDF to Word Converter.

最好用的PDF轉Word工具跟藏經閣合作:現在只要在這篇FB留言https://www.facebook.com/twcsie/posts/769416453077635,就有機會在2014/5/31抽到一組免費正版序號(終生)

軟體下載Wondershare PDF to Word Converter:
  1.  官方網站下載(最新)
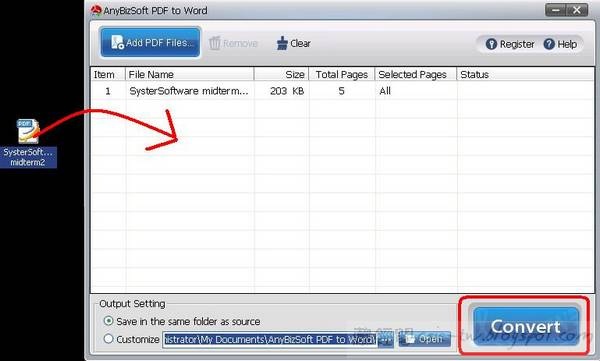
使用方式也非常簡單,只要把PDF打拖曳進程式,按下"Convert"按鈕,就可以轉成WORD檔了。
csie-tw.blogspot.com (1)
效果如下:左邊為原始PDF檔,右邊為轉換後的WORD。
csie-tw.blogspot.com
優點:速度快、轉檔正確性高、支援中文、可以批次轉檔(一次轉多個PDF檔)。
缺點:需要申請免費註冊碼。

4. Free PDF to Word Doc Converter

Free PDF to Word Doc Converter是一款完全免費、免序號的PDF轉WORD軟體。下載點:http://www.hellopdf.com/files/pdf2wordsetup.exe
在左上角選擇你要轉的PDF檔案,接著按左下角的「Convert to Word Document」即可完成。不過經版主測試後,發現Free PDF to Word Doc Converter對中文不支援。
Free PDF to Word Doc Converter
優點:免費、免序號申請
缺點:中文不支援


四大PDF轉Word的方法評比

  1. 如果你臨時有PDF轉WORD的需求時,但是電腦又不能安裝軟體時,建議使用pdfonline提供的線上工具。轉換速度快,又不用提供Email,快速又方便。
  2. 如果你想要大量快速轉檔,還是安裝AnyBizSoftPDF to Word Converter ,轉換精確、速度又快,不會出現pdf轉word亂碼問題。竟然有免費續號可以申請,也不必pdf轉word破解下載,就花點時間免費註冊吧!

PDF推薦文章:

簡易製作PDF文件-BullzipPDFPrinter
PDF Split and Merge(PDF分割與合併)

2014/05/07

(市面上最好用PDF轉Word) Wondershare PDF to Word Converter簡易操作教學

Tags: PDF2Word Online,將PDF轉Word檔,ConvertPDFtoWord,Doc 轉換為 PDF,線上免費PDF轉Word檔,PDF-to-Word,pdf 破解,pdf轉jpg,pdf轉word檔,pdf轉word軟體下載,線上pdf轉word,pdf轉word免費,pdf轉word檔免費下載,pdf轉word亂碼,pdf轉word破解,pdf轉word破解下載


最好用的PDF轉Word工具跟藏經閣合作:現在只要在這篇FB留言https://www.facebook.com/twcsie/posts/769416453077635,就有機會在2014/5/31抽到一組免費正版序號(終生)

Wondershare PDF to Word Converter是一個易於上手的工具程式,專門將 PDF 格式的檔案轉換為 Microsoft Word 文件檔案 (.doc 和 .docx) 。只需按一個按鍵,便能輕易的把唯讀的 PDF 檔案轉換成可修改的 Word 文件檔案。 轉換成的 Word 文件檔案,可完全保留原始檔案的頁面佈局、文字內容及圖片。 PDF to Word 可同時間轉換最多 10 個 PDF 檔案,另外,你亦可在轉換時選取 PDF 檔內的某一頁碼。
當要修改或整理一些 PDF 檔案時,發現原稿遺失了 ! 但卻因為PDF檔案的唯讀性而變得束手無策。想要剪貼取得內容,重新製作,也許要花上幾個小時,甚至幾天時間,也浪費不少精力。現在有了 PDF to Word,事情就變得簡單了!

PDF to Word是一套易用、省時又高效率的軟體,是專為 PDF 格式的檔案轉換為Word 文檔 (.doc 和 .docx) 而設計。您只需要按一個鍵,就能輕易地把唯讀的 PDF 檔案轉換成可修改的 Word 格式文檔。
轉換成的 Word 文檔,能高度保留原檔的頁面佈局、文字內容及圖片。 PDF to Word 可以同時轉換高達 10 個 PDF 檔案,另外,你也可選取 PDF 檔內的某一頁作轉換,十分方便。
容易使用的介面
  • 單一操作介面
  • 所有設定均可在操作介面內進行設定。
支援格式
  • 支援輸入 Adobe PDF 1.0 - 1.7 格式 (.pdf);支援已加密的 PDF
  • 支援輸出 MS Word 2003-2013 格式 (.doc, .docx)
匯入的 PDF 檔案
  • 支援在同一時間來匯入最多 10 個的 PDF 檔案
  • 支援拖拉動作,PDF 檔案可被直接拖拉至程式中
轉換
  • 批量式轉換 ── 可在同一時間轉換多個 PDF 檔案
  • 部份轉換 ── 使用者可選取 PDF 檔內的某些頁碼來轉換
  • 快速轉換 ── 在一個 PDF 檔案上按鼠標右鍵彈出功能表再選以 AnyBizSoft PDF to Word 轉換, 而不用開啟主畫面
  • 管理匯入檔案 ── 使用者可以隨意決定匯入檔案轉換的優先次序及移除被錯誤匯入的檔案
  • 高速 ── 轉換的速度快捷。在轉換過程中,會有進度指示器顯示個別的檔案轉換進度
良好的保存
  • PDF to Word 可保留 PDF 原檔的頁面佈局、文字、列、表及圖片。而不需要重新編輯匯出的檔案。
檔案檢視
  • 匯入的 PDF files 可在轉換前於預先安裝的 PDF Reader 預覽。
  • 轉換後,使用者可直接開啟轉換檔案或在輸出資料夾打開檔案。
(以上文字介紹來源:軟體王)。

操作方法

最好用的PDF轉Word工具跟藏經閣合作:現在只要在這篇FB留言https://www.facebook.com/twcsie/posts/769416453077635,就有機會在2014/5/31抽到一組免費正版序號(終生)
軟體下載Wondershare PDF to Word Converter:
  1.  官方網站下載(最新)
使用方式也非常簡單,只要把PDF打拖曳進程式,按下"Convert"按鈕,就可以轉成WORD檔了。
csie-tw.blogspot.com (1)
效果如下:左邊為原始PDF檔,右邊為轉換後的WORD。
csie-tw.blogspot.com
PDF推薦文章:
4種PDF轉Word的免費方法
簡易製作PDF文件-BullzipPDFPrinter
PDF Split and Merge(PDF分割與合併)

2013/11/04

[ExtJS] 選取textfield部分文字

如果你想要用程式的方式去選取textfield裡特定的文字,各瀏覽器有自己的實作方法,我們使用ExtJS包裝起來,方便開發者使用。

使用案例:
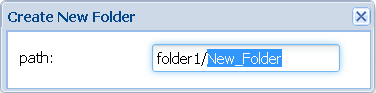
我們使用ExtJS做一個FTP client,在實作"建立新資料夾"的功能時,將會跳出一個Window,裡面包含了一個path field。
參考Filezliia的做法,假設原本的資料夾叫foder1,它會在其後加上/New_Folder當作是新的資料夾名稱,並且會將New_Folder反白起來。因此,使用者可以直接使用這個資料夾名稱。或者直接輸入自定的資料夾名稱,原本預設的資料夾名稱則會被取代。


實作程式碼:
Ext.define('Ext.enhance.form.field.Text', {
 override : 'Ext.form.field.Text',
 selectText : function(start, end) {
  var field = this.inputEl.dom;
  if (field.createTextRange) {
   var selRange = field.createTextRange();
   selRange.collapse(true);
   selRange.moveStart('character', start);
   selRange.moveEnd('character', end);
   selRange.select();
  } else if (field.setSelectionRange) {
   field.setSelectionRange(start, end);
  } else if (field.selectionStart) {
   field.selectionStart = start;
   field.selectionEnd = end;
  }
  field.focus();
 }
});

使用範例:
Ext.define('TonyTuan.CreateFolderWin', {
     extend : 'Ext.window.Window',
     width : 300,
     layout : {
           type : 'fit'
     },
     title : 'Window',
     initComponent : function() {
           var me = this; 
           me.defaultFocus = 'path'; // set focus before call selectText() 
           me.items = [ {
                xtype : 'form',
                bodyPadding : 10,
                layout : 'anchor',
                defaultType : 'textfield',
                items : [ {
                     fieldLabel : 'path',
                     name : 'path',
                     itemId : 'path'
                } ]
           } ];
           me.callParent(); 
           me.on({
                // set default value for path
                show : function() {          
                           me.down('#path').setValue('folder1/New_Folder');
                          me.down('#path').selectText(6,18);         
                }
           });
     }
});

PS: 即使沒有要用selectText,養成設定defaultFocus的習慣,可讓使用者開啟視窗的時候直接輸入,不用再用滑鼠點擊field。

2013/08/21

[ExtJS] 移除File Field出現"No file chosen"(未選擇檔案)提示

當我在用js開發檔案上傳的功能時,我發現當File Field的欄位是空的時候,就會出現"No file chosen"(未選擇檔案)提示。我看了stackoverflow的一些解法,但沒有一個是成功的。


No file chosen
"No file chosen" tooltip

<html>
<head>
</head>
<body>
<input type="file" multiple/>
</body>
</html>


不過我用gmail附件功能時,發現的確是有辦法移除預設的提示,改用自訂的提示。


Gmail可以客製化檔案上傳提示


所以我花了一些時間去trace gamil的source code,發現那個Attach files”按鈕,只是一個div tag,當然可以自訂提示。但是div tag因為安全性因素,是無法trigger檔案選擇器的,一定要file input field才有這個權限。


但是為什麼gmail卻可以做到?其實呢,div tag只是一個wrapper,還是有一個file input field隱藏在背景的。一旦div tag收到click event,我們只要控制程式去trigger file input field的click event可以達到這樣的效果。然後只要在file input field聽onchange event,就可以知道user選哪些檔案了!


以下是ExtJS的範例關於file input field wrapper的範例:


Custom Tooltip for File Uploading in ExtJS


Ext.define('TonyTuan.BrowseButton', {
extend : 'Ext.button.Button',
icon : 'css/images/arrow_up_16x16.png',
text : 'Browse...',
constructor : function(config) {
var me = this;
config.tooltip = 'Attach Files'; // Show custom tooltip instead of "No file chosen".
me.callParent([ config ]);
},
handler : function() {
document.getElementById('upload-field').click(); // To trigger the file field click event
}
});

Ext.define('TonyTuan.FileGrid', {
extend : 'Ext.grid.Panel',
alias : 'widget.fileGrid',
title : 'Files',
store : 'File',
initComponent : function() {
var me = this;
me.columns = [ {
dataIndex : 'filename',
header : 'Filename',
} ];
me.tbar = [ Ext.create('TonyTuan.BrowseButton', {
itemId : 'browseButton'
}) ];
me.callParent(arguments);
}
});

Ext.define('TonyTuan.FilePanel', {
extend : 'Ext.panel.Panel',
title : 'Files',
layout : 'border',
initComponent : function() {
var me = this;
me.items = [ {
region : 'center',
xtype : 'fileGrid',
layout : 'fit',
flex : 3,
margins : '5 5 0 0'
}, {
hidden : true,
region : 'north',
xtype : 'component',
html : '<input type="file" multiple id="upload-field"/>'
} ];
me.callParent(arguments);
me.on({
afterrender : function() {
document.getElementById('upload-field').onchange = function() {
var files = document.getElementById('upload-field').files;
console.log('files', files);
// Add files to your fileGrid store
};
}
});
}
});

2012/11/08

[ExtJS 4] Change Progress Bar Color Dynamically According to the Value of Progress Bar

ExtJS doesn’t provide API to change progress bar dynamically. However, it’s not too diffcult to make it possible by changing CSS dynamically. In the following example, we implement a lister for update event, which change CSS according to the value of progress bar.

image

blue progress bar if value < 0.5

image

red progress bar if value >= 0.5

It’s tested on Firefox 16, Chome 22, and IE 9 with ExtJS 4.1.1a.

progressbar.htm

<html>
<head>
<script type="text/javascript" src="ext-all.js"></script>

<script type="text/javascript">
   

Ext.require([
    'Ext.ProgressBar'
]);
Ext.onReady(function(){
    var pbar = Ext.create('Ext.ProgressBar', {
        id:'pbar',
        width:300,
        renderTo:'bar',       
        listeners: {
            update: {
              fn: function (bar, value) {         
                    if(value<0.5)
                    this.setUI('blue');   
                else
                    this.setUI('red');
              }

            }
        }       
    });
    var btn = Ext.get('btn');
    btn.on('click', function(){     
        pbar.wait({
            interval: 500,
            duration: 5000,
            increment: 15,
            fn:function() {                    
            }
        });
    });
});

</script>

<style type="text/css">
.x-progress-red .x-progress-bar {
    border-right-color: #FF0000;
    border-top-color: #FF0000;
    background-image: none;
    background-color: #FF0000;
}

.x-progress-blue .x-progress-bar {
    border-right-color: #0000FF;
    border-top-color: #0000FF;
    background-image: none;
    background-color: #0000FF;
}
</style>
</head>
<body>
    <button id="btn">Show</button>
    <BR />
    <div id="bar"></div>
</body>
</html>

2012/05/09

[ExtJS 4.1] Mark a red Asterisk/Star on an Required Fields

Making a red asterisk on required fields makes your user realize they are not allowed to be blank by intuition. In ExtJS, you can specify fields which cannot be blank such as the following code.

            items : [ {     
                xtype : 'textfield',    
                fieldLabel : 'Name',
                allowBlank : false,               
            }, {
                xtype : 'numberfield',
                fieldLabel : 'Age'                  
            } ]

I found a patch working fine on ExtJS 4.07 to realize this requirement.

Ext.override(Ext.layout.Layout, {
    renderItem
: function(item, target, position) {
     
if (item && !item.rendered && item.isFieldLabelable && item.fieldLabel && item.allowBlank == false) {
        item
.fieldLabel += '<span class="req" style="color:red">*</span>';

     
}
     
this.callOverridden(arguments);
   
}
});

ExtJS 4.0 Mark a red Asterisk on an Required Field

Mark a red Asterisk on an Required Field on ExtJS 4.1

And I modify it a little bit to make it work in ExtJS 4.1 MVC application architecture as following.
this.control({
'field' : {
beforerender : function(thisField, eOpts) {
if (thisField && !thisField.rendered && thisField.isFieldLabelable && thisField.fieldLabel && thisField.allowBlank == false) {
thisField.fieldLabel += '<span class="req" style="color:red">*</span>';
}
}
}
});

2012/02/18

[ExtJS] Keeping Grid Selections After a Store Reload in Grid

In some cases, we have no idea what time the data in grid is out of date. In order to get the last data in server, it’s necessary reload store in grid periodically. However, after a single/multiple slelection grid reload, the selection state will be lost (i.e., No records are selected).

image

A checkbox selection example

To slove this probelm, firstly, we have to push each selected records into grid’s variable selectedRecords whenever 'selectionchange' event is fired from grid. Something like this:

Ext.each(selecteds, function(selected) {
     me.selectedRecords.push(selected.index); 
});

Secondly, restore the selection state by selecting the records recored in selectedRecords whenever 'datachanged' event is fired from store (i.e., data is reloaded from server) is fired.

Ext.each(me.selectedRecords, function(r) { 
     me.getSelectionModel().select(r, true);
});
The complete example code is shown below. It’s tested under ExtJS4.0.

SelectionStatefulGrid.js

Ext.define('Vos.view.SelectionStatefulGrid', {
    extend : 'Ext.grid.Panel',
    selType : 'checkboxmodel',
    selModel : {
        mode : 'MULTI'
    },
    store : 'myStore',
    columns : [
        {
            header : 'my date',
            dataIndex : 'data'
        }
    ],
    initComponent : function() {
        var me = this;
        me.callParent();  
        me.selectedRecords = [];
        me.unlockState = false;
        // Push the the selection state into selectedRecords
        me.on('selectionchange', function(selectionModel, selecteds) {
            if (me.selectedRecords != null && me.unlockState) {
                me.selectedRecords = [];
                Ext.each(selecteds, function(selected) {
                    me.selectedRecords.push(selected.index);
                });
            }
        });
         // Select the records in selectedRecords
         me.getStore().on('datachanged', function(store, records) {
            Ext.each(me.selectedRecords, function(r) {
                me.unlockState = false;
                me.getSelectionModel().select(r, true);
            });
            me.unlockState = true;
        });        
    }
});

Buddhism and Software Developer

In today's fast-paced society, we are often surrounded by work, goals, and external pressures. However, the wisdom found in Buddhism off...